Followers

NOTICE:

Now you can click on photo and it will zoom in. Thanks to the HighSlide Javascript. How to do it? its in my "Blog Stuff" page...

Tuesday, December 27, 2016

1/35 Italeri Tiger (P) Elefant: WIP#2- Paint & Wash & decal


This build will be placed under: 1/35 Italeri Tiger(P) Elefant
and also will be in my site: Kumanworks.com when its done :o)

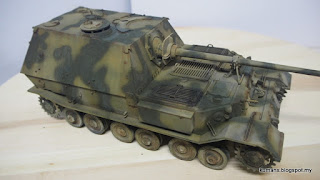
After i completed the camo painting, noted that i still need to touch-up the camo.

But me being impatience, decided to flat coat the model and went straight to wash and decal (ideally should be decal then wash).


 i'm doing wash by using the Tamiya Panel Line accent (brown & black) and using oil paint (raw umber & black) with Zippo fluid.


with all this washes, i might need to redo it after the decal and after i touch-up the camo... repetitive work which can be avoided if i'm a bit patience....


Decal is next:
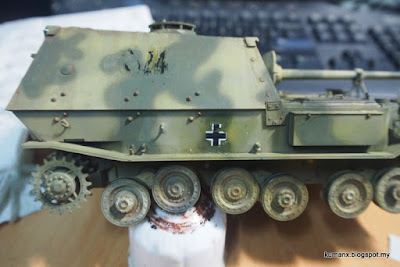
This being a very old kit, the decal decided to disintegrate upon contact with water.. so i end up with a meticulous work of placing the decal in a puzzle style. In bit and pieces and with the help of a tweezer. The end result is as follows:


I suppose this is *maybe* ok since in the field this might happen... right? (me trying to justify the bits and pieces i put together :lol:)


This should be it for now.
next the touch-up of the camo.... and another wash..

BTW: i also begin working on a F-14A Jolly Rogers, will up the WIP soon.
until then.. :)

Tuesday, December 20, 2016

1/35 Italeri Tiger(P) Elefant: WIP#1 - Build & paint

I'm back with another build..
After almost a month of hiatus (busy with work, life etc), i'm back with my next build.

This build will be placed under: 1/35 Italeri Tiger(P) Elefant
and also will be in my site: Kumanworks.com when its done :o)

This time a build to *hopefully* support my local Group Build called "Animal GB". Basically to build anything with an animal name in it... so i guess Tiger & Elefant should be an animal name. So i choose this instead.

Originally this is for Age of Innocence GB (kit with mold dated back in the 80's) but i could make it in time (hence the hiatus), so animal GB it is then.

Thanks Google..
Build
the instruction is very spartan but as for OOB build i just use some guessing on the placement of the parts. A few issue here and there but it build up to be (from my eyes) an Elefant tank :)

Paint
Again i skipped the surfacer treatment and went straight to painting the base color over the dark-green plastics. I used the mixture of Sandy yellow + dark yellow and the result is as follows:


i intentionally using a light passes of the mixture to at least have the patchy look on the tank surface.

Next the green camo.
I use Nato green and before that i draw the camo pattern on the tank with a pencil, if you look closely you might still see the marking on there as it not properly covered by the green camo.

 With this pattern as a guide, i freehand airbrush the camo using a rounding movement of the airbrush, making a tiny circle for the pattern to build up the camo (hopefully you guys know what i meant).

Result below.


That's it for now...
NEXT: continue with paint, clear coat, decal, wash?

Tuesday, November 15, 2016

1/35 Trumpeter "Sturer Emil" - its DONE!!

Its DONE!!!
This build will be placed under: 1/35 Trumpeter "Sturer Emil" label
and also will be in my site: Kumanworks.com when its done :o)

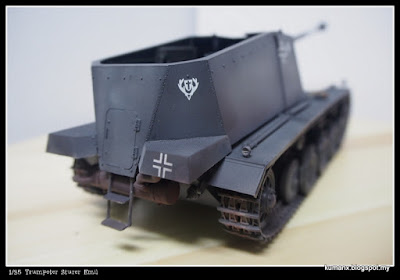
After a couple of months on the bench.. i'm glad this tank is DONE!!
so that i can move on with other build.... the Elefant tank...
My first open-top tank so please be gentle. :lol:


As i mentioned before, not much weathering will be on my tank as i like it a clean but for this i'm going a bit crazy on the lower part of the hull.

I used soft pastel earth tones mixed with water to achieve the effect as it is.

Before i apply the dust, i wash with raw umber/black/sienna oil paints+ zippo fluid applied around the raised area on the tank.
The wash it being applied with the downward direction while maintaining some of the "residue" of the oil in the bolt area.
Ammo storage (note the gold shell)

My digicam just failed to focus on macro shot, thus resulted in the above and below photo, not very clear but i guess we can see the small parts painting i've done to it. My shaking fingers just cannot stand painting small parts!!. and this is all i can manage. Hope it does justice to the tank.

Another angle of the open top


 another side of the tank. note the kill-marking on the barrel...


i think its illogical for the crew to leave the ammunition like that on a tank but need to show it somewhere.. :o) 


Its done.. and moving on to the next build... Elefant tank from Italeri... next WIP will be up soon.. stay tune.
and thanks for the support... and encouragements!!.


Wednesday, November 09, 2016

1/35 Trumpeter "Sturer Emil" - WIP#3 - More Painting

More Painting of the "Stubborn Emil"

This build will be placed under: 1/35 Trumpeter "Sturer Emil" label
and also will be in my site: Kumanworks.com when its done :o)

Continue with the painting step.

i custom mixed the grey using Gunze Dark grey (i cant remember the code) with some flat black.
Painted overall giving some more paint near the raised element on the tank.
Also (trying) to do some color modulation on the lower part of the hull.


Noted that i skipped the decal step for this entry as it is pretty straight forward process after the painting.

After painting, i flat coat the whole model in preparation for the decal.
Again another coat of clear to seal the decal, in preparation of the next process... minimum weathering.


i painted the box after i glue it to the tank.
I did it this way as i always have the tendency to loose these small parts.
All the small parts are hand-painted using Vallejo paint.


 The floor is a bit shiny for now, will flat coat it later to tone the shininess (is there such word?) down a bit.


The seat also got minimum wear to it :o)


Next: Weathering.. a very minimum weathering...
also i started working on another tank.... an Elefant from Italeri for my local Group Build.. stay tune for that WIP as well.


Tuesday, November 01, 2016

1/35 Trumpeter "Sturer Emil" - WIP#2 - Painting

Moving on with the build. Painting the "Stubborn Emil"

This build will be placed under: 1/35 Trumpeter "Sturer Emil" label
and also will be in my site: Kumanworks.com when its done :o)

Now i'm at the painting stage and i decided to go against my normal routine... this time i didnt use Mr Surfacer prior to painting.
Wanted to try this as a couple of my friends did it with no issue.. :o)

so straight to the paint..


my cam doing some trick to my photo, it change the grey to slight bluish!!
The wooden floor is hand-painted with a bit darker color towards the edge...
my so called logic to it being stepped on :)


The body also received a coat of paint. The internal is not painted yet.. as most of it will not be visible anyway.

I glued the tools on the tank which will be painted by hand at the later stage.

Next: More painting

Monday, October 31, 2016

1/35 Trumpeter "Sturer Emil" - WIP#1 - Build

This build will be placed under: 1/35 Trumpeter "Sturer Emil" label
and also will be in my site: Kumanworks.com when its done :o)


With the completion of my F-15 build, moving on with next subject a Sturer Emil from Trumpeter.
Another OOB build from me.. (need to keep the momentum going)


Never build a open-top tank before.. here goes.. :)

 A fairly fast build as i just follow the instruction, but need to pause a few step since some of the interior need to be painted first.
 Dry fit of the gun assembly and the open-top.

 The gun without the top :o)


This gun mount have to be the most complicated section of the build .. so far


NEXT: Painting the innard


Monday, October 24, 2016

1/48 Academy F-15E - Completed!

This build will be placed under: 1/48 Academy F-15e label
and also will be in my site: Kumanworks.com when its done :o)

As promised a long time ago, a completed photos of my recently finished 1/48 Academy F-15E Strike Eagle.
The build was Out-Of-The-Box build with no extra PE and stuff.
Noted that i decided to put a lot of ordnance under the wings and i believe such load is not logical and the plane would not be able to leave the tarmac due to the weight of it. But i just like to show a lot of weapon in my build.

Enough chat on to the photos.. before that i prepare a small time-lapse video below. My first attempt for a video of my build. the photos follow right below.


Related Posts with Thumbnails