Followers

NOTICE:

Now you can click on photo and it will zoom in. Thanks to the HighSlide Javascript. How to do it? its in my "Blog Stuff" page...

Wednesday, December 29, 2010

Modelling RAF Tornado Gr1 - Desert Storm - "Decal WIP... "

Decal application is ongoing.!!


After preparing all the necessary solutions and "mindset" (yes!! need to have a clear mind to do decal, if your mind in a mess; STOP and get some fresh air before you proceed :o) ), it's time to begin the "interesting" step of "decorating" the Tornado.


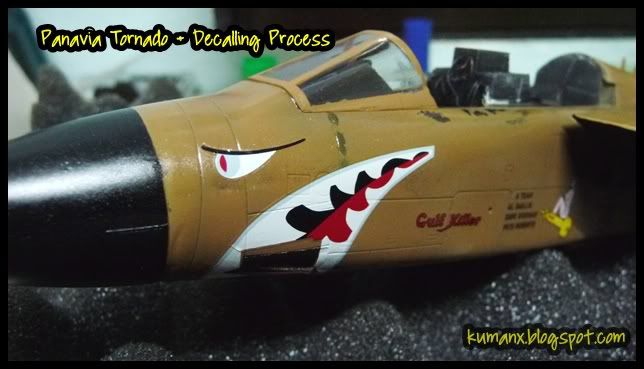
Here is the decal that i'm going to apply on my Tornado, its a ferocious "smiling-shark" markings that is quite a sight during the Desert Storm air-campaign.

Around the gun-vent i need to touch-up a little bit with paint, somehow the decal not covering it properly.
The complete decal can be seen below.

Monday, December 27, 2010

Modelling RAF Tornado Gr1 - Desert Storm - "Decal Preparation ... "

Before i proceed with the decal progress of my Panavia Tornado "Gulf Killer"

i just want to share my working station for the decal process...

First the most essential tools during the decal process (for me at least):

As the name indicated: Mr Mark Softer & Mr. Mark Setter

Mr Mark Setter = to prepare the surface to accept the decal.
Mr Mark Softer = to make the decal "softer" so that it will conform to the surface of the model better.

i usually would use Mr setter on the surface, once the decal is applied on the surface, i would use the Softer on top of it before i seal the whole thing with FUTURE Floor Polish .

Saturday, December 25, 2010

Modelling RAF Tornado Gr1 - Desert Storm - "ECM Pods ... "

Another round... as i try to keep the momentum going...

last night i painted the 500lbs bomb & the fuel tank & the various pods.. (Sky Shadow ECM & the BOZ-107 Flare dispenser)

All these will be hanged under the wings and belly of the tornado.


the 500lbs bomb i painted using Gunze Green paint while the pods i use the same mix as my Tornado body paint (mixture of Dark yellow + a bit or red).

The Fuel tank is first painted using the grey and then camoed with the same Green as the bomb.


I only need to paint the missile at the back with white.. then we can proceed to decal over the weekend.. :D

Stay tune..

Friday, December 24, 2010

Modelling RAF Tornado Gr1 - Desert Storm - "More Chipping... "

Continue on with the build.

As referring to my previous update, a few of my modelling colleague suggested me to add more small paint chipping effect to the model.

So armed with my fine-tip-brush and an Olive-green Vallejo paint, i begin the extra-chipping process.

After a few minutes, here is the result.


Thursday, December 23, 2010

Modelling RAF Tornado Gr1 - Desert Storm - "Chipping & Future"

Another round of update:

Paint chipping on a regularly used aircraft is normal, so i try to replicate this in my build as well and this is the first time i'm doing it.

I'll be using a product called "Masking Sol" to cover the previous paint (from the pre-shade process) to show the paint underneath once i remove the final layer of paint from the chipped area.


The yellow tape above is to protect the surrounding area around the airbrake base once i begin to spray the paint there (this will be done tonight). Note the paint chipping on the Horizontal Stabilizer.

Wednesday, December 22, 2010

Modelling RAF Tornado Gr1 - Desert Storm - "Final Paint Layer"

In light of the last paint layer, a few of my modelling colleague commented that my panel-lines need to be covered a lil bit more so that it wouldn't too "pronounce".

So due to that suggestion, i mixed up another paint mixture but this time i tone the red-color down a few drops (so the color will have more yellow in it) and begin spraying the final layer to cover some of the panel lines (noted: some not all, if cover all the panel-lines then what the purpose of me doing the pre-shades earlier, right?) :D

Thanks to my modelling buddies for the suggestions.


and below is the result of the final paint layer.

First is the side by side comparison of the paint layer.
The one on the right have the red color tone down by a few notch and also noted that the panel lines are less visible now.

Now there rest of the aircraft.


Monday, December 20, 2010

Modelling RAF Tornado Gr1 - Desert Storm - "Painting Base Color"

Updates:

i was on a break last week, so; sorry to those that stop by and wanted to see the updates on my Tornado.

But yesterday i have a very productive day (although i did have an issue with my handpiece not working properly due to a clogged nozzle and uncontrollable air flow).

Finally the Tornado got the paint done already and below is the result.


I use Tamiya Dark Yellow (XF-60) mix with a few drops of Tamiya Flat Red (XF-7).
From my eyes and my reference, this looks like a close-enough match for the paint on the real aircraft.

So i'll settle to this color for now.

Noted that the inside of the airbrake is not yet painted, i'll get to it later tonight.
The same goes to the inside of the wheel bay (front and rear)

Also will masked the radome and paint it gloss black later on.


Thursday, December 09, 2010

Modelling RAF Tornado Gr1 - Desert Storm - "Pre-shading"

Another updates:

Last night i manage to do pre-shading on the tornado.

This time i use Dark-green instead of the regular black.

The reason for pre-shading is to make the recess line darker as compared to the overall color as evident on a real aircraft.

On real aircraft, the panel lines will be slightly darker so pre-shading will give the impression of the same effect on the model.

And i use my handpiece to make the line by using a low pressure and make sure the handpiece nozzle as close as possible to the panel line on the model.

(more shots below)

Wednesday, December 08, 2010

Modelling RAF Tornado Gr1 - Desert Storm - "Priming" DONE!!

Another round of updates..
 (to see previous "progress"of this tornado click ME! )

As promised,

over the weekend i manage to complete the "Priming" of the Tornado.

Here is the result.


So tonight i can continue with the "Pre-shading" process. 
Pre-shading will make the aircraft dirty again :D

I'll pre-shade it with a dark-grey paint which is out of the norm for me as i usually would use black for the preshade process.
i'll explain more with photos tomorrow for better understanding.

in the mean time, here is another shot of the Tornado after priming.

Friday, December 03, 2010

Sneaking into my Modelling Room :Kuman's Workbench....

Today we take a sneak-peek into my Modelling Room or Workbench...


(seen here with my Panavia Tornado in the works)

This is where all the modelling action is and not many people are allowed to play in this room (especially if i'm not around) due to the below reasons:
  • Sharp objects (all those cutter, knifes, nipper)
  • Hazardous substances (all the putty, thinner, IPO, glue)
  • Plastic dust (when i'm sanding)
  • Paints particle (when i'm airbrushing my model)
Whenever i'm airbrushing or sanding the model, i will switch on the fan for ventilation and i'll wear my "nuclear" safety respirator.

More photo with "label" after the jump

Wednesday, December 01, 2010

Modelling RAF Tornado Gr1 - Desert Storm - Ready for "Priming"

Another round of updates..

With roughly around 1 month till the due date, my Panavia Tornado GR MK1 "Gulf Killer" is progressing at a nice and steady pace.

Now i'm getting ready the plane for a "priming" stage by covering the aircraft with a layer of Mr Surfacer 1000.


Currently this model is a bit boring to look at since all we  see is only the plain, grey color of the plastic.
This will start to changes once its been primed.

This stage (priming) serves 2 important purposes:
1. Checking for flaws in the join and also if any gaps needed to be covered plus this also will make all the scratches visible. Thus would help in repairing the flaws.


Related Posts with Thumbnails