Followers

NOTICE:

Now you can click on photo and it will zoom in. Thanks to the HighSlide Javascript. How to do it? its in my "Blog Stuff" page...

Saturday, December 13, 2014

F-16C: "The Flying Razorbacks" Arkansas ANG (The Unfinished Business Campaign) - COMPLETED!!

F-16C: "The Flying Razorbacks" Arkansas ANG (The Unfinished Business Campaign)

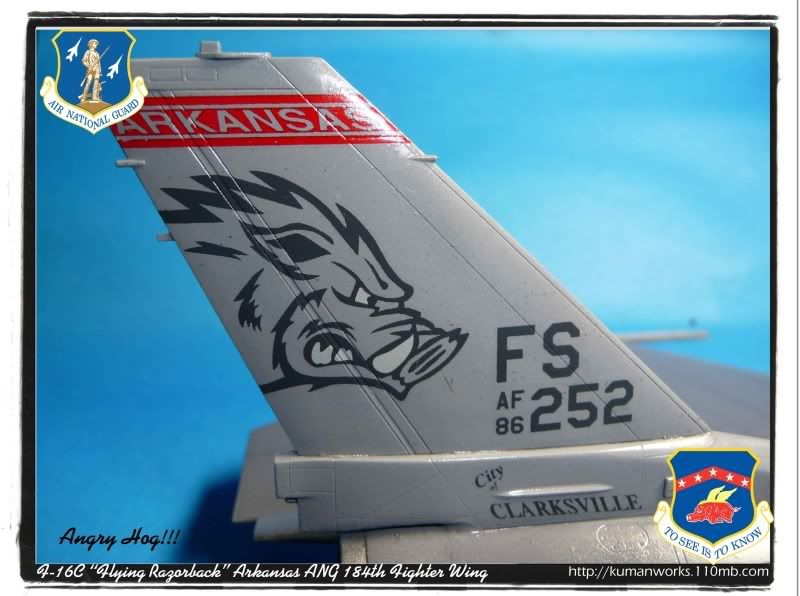
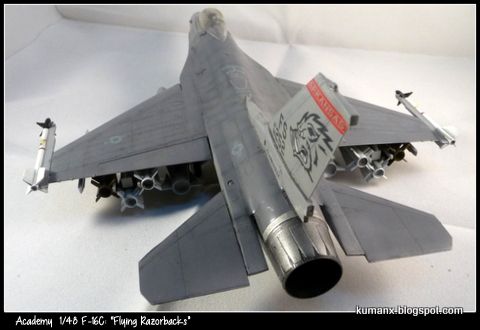
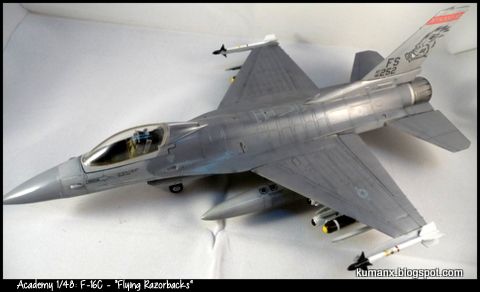
1/48 Academy F-16C: Fighting Falcon "The Flying Razorbacks"

After years of procrastinating on finishing this.. Armorama created a campaign (Unfinished Business Campaign) whereby members need to complete their uncompleted kits (due to many reasons) and i heed the call and get this done..:D


This was actually part of a 3 F-16c that i wanted to build simultaneously for a local Viper GB, but never get around to finish them in time.

The WIP can be viewed at my local forum thread... 2 of them...

WIP#1
WIP#2

anyway... its done now... and i need to check the other 2 of the F-16 that also need my attention..

its missing a pitot over the years.. but it is done..


i have another one for the campaign... Panda Models X-35B.. will post that next,,

Monday, November 24, 2014

Trumpeter CH-47A Chinook Helicopter - WIP#1

Trumpeter 1/72 CH-47A Chinook Helicopter


To get the motivation going.. i joined the build for the upcoming Land & Air Transport Group Build (from FB) coming up in March 2015.

I'm not too sure if i can physically joined the event but the spirit of the build have to continue.. so i join in with a Chinook helicopter..

this is a fairly small kit.. but i believe the mold is a shrink down version of the big sister from Trumpeter

review can be viewed@ Cybermodeler.com & @Hyperscale

first of all.. this is going to be OOB build my plan is to have it in Rotor-fold config... since the span of the rotor blade needs a hefty estate to display.. but we'll see..
anyway this is the scheme that i intend to do.. a abit more colorful choices of the provided decal other than the boring olive drab


i start with the IP.. added some wire behind it since this will be visible through the glass cockpit... and i use a creative license to put the wire in..
the cockpit is completed.. and the innard of the fuselage also done with the seatbelt although i didnt mate the fuselage just yet...
most of the thing will not be properly visible when its done... biggrin.gif
anyway the photo follows

the "office" area


The instrument panel.. nothing fancy.. just drybrush with grey only
The windows with a "so-called" seatbelt visible from outside... maybe i need to use a thinner tape to replicate the seatbelts...


until later/... :D


Saturday, September 13, 2014

IDF Merkava 2 with KMT-4 Mineroller - ITS DONE!!

And its finally DONE!!!

on Friday September 12, 2014... with 1 day to spare until the event..

the rest of the W.I.P can be viewed All my Merkava 2 WIP.

Something come up at the last minutes, so i cannot make it to the event Modern AFV Showdown.. so this will only make an appearance as a virtual entry :(

Since i'm not really into figures.. so my base for the Merkava is without any figure.

This a very good experience for me and quite frankly only my 2nd tank that i did weathering to this level...
still much.. much.. more to learn and a lot more mistakes to encounter.. but this is it for this Merkava 2.

Enjoy the photos.. :) (click on the photo for a larger view) 
comments are welcomed.


will take a few days of break before i proceed to my next project... Stryker ICV and a few pending aircraft models on the workbench....

Thanks for the visit..

Wednesday, September 10, 2014

IDF Merkava 2 with KMT-4 Mineroller - Wip#5 - FINAL

UPDATES...3 Days to go!!


The rest of the WIP can be viewed @ All Merkava 2 WIP

i really hope that this is the last WIP update for this build.. next update (...hopefully...) is a completed updates...

from my eyes.. this is about as much i can do for this build.. still a few things pending which will be added by the time this completed... and still have 3 days until the event....

thing that i need to add:

1. Antennas
2. cover/mesh/net cover for the turret basket.
3. add machine-guns
4. blend the track to the base
5. add some Future to the front of the tank... a puddle of water if you may.
6. almost forget... flat coat the turret
7. A proper photoshoot for the build..

Unfortunately... the Jersey Barrier i created earlier will be present in this base sad.gif.. due to space constraint.. sad.gif

until then.. enjoy the grainy photos below..

Overall


Exhaust
Basket


KMT4 Mine roller

until later.


Thursday, September 04, 2014

IDF Merkava 2 with KMT-4 Mineroller - Wip#4 - Dry fit


9 days and counting!!

progress report as of last night... biggrin.gif

the base is basically at 70% done... now i need to make sure the base is not too out of place compared to the tank...

need to test the composition and start "joining" the tank to the base..

Merkava 2 Build LOG..

as a dry-run below are the progress thus far..

(i might change the tank position to have it facing the other way, as i'm running out of land area for the tank)

side view (note the "joining".. need some toning there and also some fine sand..)

A little close-up on the turret. note that the turret window now have a glass cover.. i use a confetti leftover with the "ok" color.

the same for the driver window on the main hull (is this what they are called?


UPDATES on the Jersey Barrier

- My 2nd polyfilla barrier is out from the mold and it seems that the addition of the PVA glue works wonder biggrin.gif .. will add more in my future Barrier biggrin.gif

time to tone-down the base groundwork and need to add some propaganda flyers to the barrier... and also some barbwire and accessories for the tank

kuman


Tuesday, September 02, 2014

IDF Merkava 2 with KMT-4 Mineroller - Wip#3- Jersey Barrier

With the dateline fast approaching... and

11 days to go...

Merkava 2 Build LOG..

After a few days leaving the cast to dry in a room temperature (not able to put it outside due to the gloomy weather)

its done and i'm glad that the WD-40 that i used as the release agent works wonderfully biggrin.gif

below are some shots of the completed jersey barrier..
noted that i still need to fill some of the holes there.. and leave some as a "decoration" for the barrier.

Side B

Side A

I primed the barrier with industrial Surfacer to cover the polyfilla.. its not as hard as resin but i guess it will be ok..
I somehow think that this is better than the plastic barrier i created earlier...
sure looks better that this

 My 2nd Barrier in the works


The 2nd barrier i added a small amount of diluted PVA glue to the mix in my attempt to make the polyfilla less "brittle"... hope that the WD-40 release agent works wonder this time around

after a dry-run.. i noticed that i might not have enough space on my base for my jersey barrier blink.gif .. let see how this would works later on...

as for the tank itself... almost done with the weathering (i rarely weather my tanks, so this is another attempt of mine for weathering)

will post more photo later

Wednesday, August 27, 2014

IDF Merkava 2 with KMT-4 Mineroller - Wip#2- Jersey Barrier

A little Update.. for the Jersey Barrier

in a bid to make my dio-base busy... i'll add some Jersey barrier..

there are a few company out there that offers the barrier in plastics & resin form but me trying to try again the task of making one tries very hard to ignore the temptation to get the AM barrier.

I've done this before with my Challenger 2 build.. so the drawings and measurement still available.. [Jersey Barrie @ Challenger 2 build]

i'll be making it 2 way.. 1) using plastics sheets 2) using the plastics sheet as a mold.

 1) its pretty straight forward... measure the drawing divide by 35 and you have the 35th scale.. draw it on the sheet and cut... and then glue all the parts accordingly.

2) Next i'll roughen the surface with thinner and brush... (next step)

below the plastics sheet version..
Making mold
i repeat the same step as above... but this time i didnt glue one side of the barrier.. so i'll be a bit easy to remove the barrier later on..

i used Lego block to hold the mold..

 tonight i'll mix some Pollyfilla and pour it into the mold.. and see how that turn out.. maybe i'll need to make the mixture a bit thick.

will post more update later on and my drawing is as below based on the original barrier drawing from the internet..


 until later...
next : The base

Thursday, August 14, 2014

IDF Merkava 2 with KMT-4 Mineroller - Wip#1

A short post and i skipped the initial stage of construction due to other commitments..

This build is in conjunction with the Modern AFV Showdown due in September 13, 2014 in HobbyHQ Kuala Lumpur.

a few other build of mine also will make a trip there... :)

anyway..
my 2nd merkava thus far and this is OOB with all of the Academy flaws that come with it... (it being a prototype version etc..)

anyway.. progress was normal according to the Instructions ..

the famous ball-and-chains-curtains were present but in the form of stiff-white metal.. so cannot compare with the other offering with the real-chains and PE... (me being true to the OOB build biggrin.gif)

i added some antislip on the surface using Tamiya dio-paint (sand grit).

and now at the painting stage..

my mix of paint is H315 + H81 ratio.. hmm maybe 3:1

after some preshading with black and 2 layers of hairspray... below is where i'm at..


The roller


kuman 
Related Posts with Thumbnails